Peppermint Cream Candies Recipe

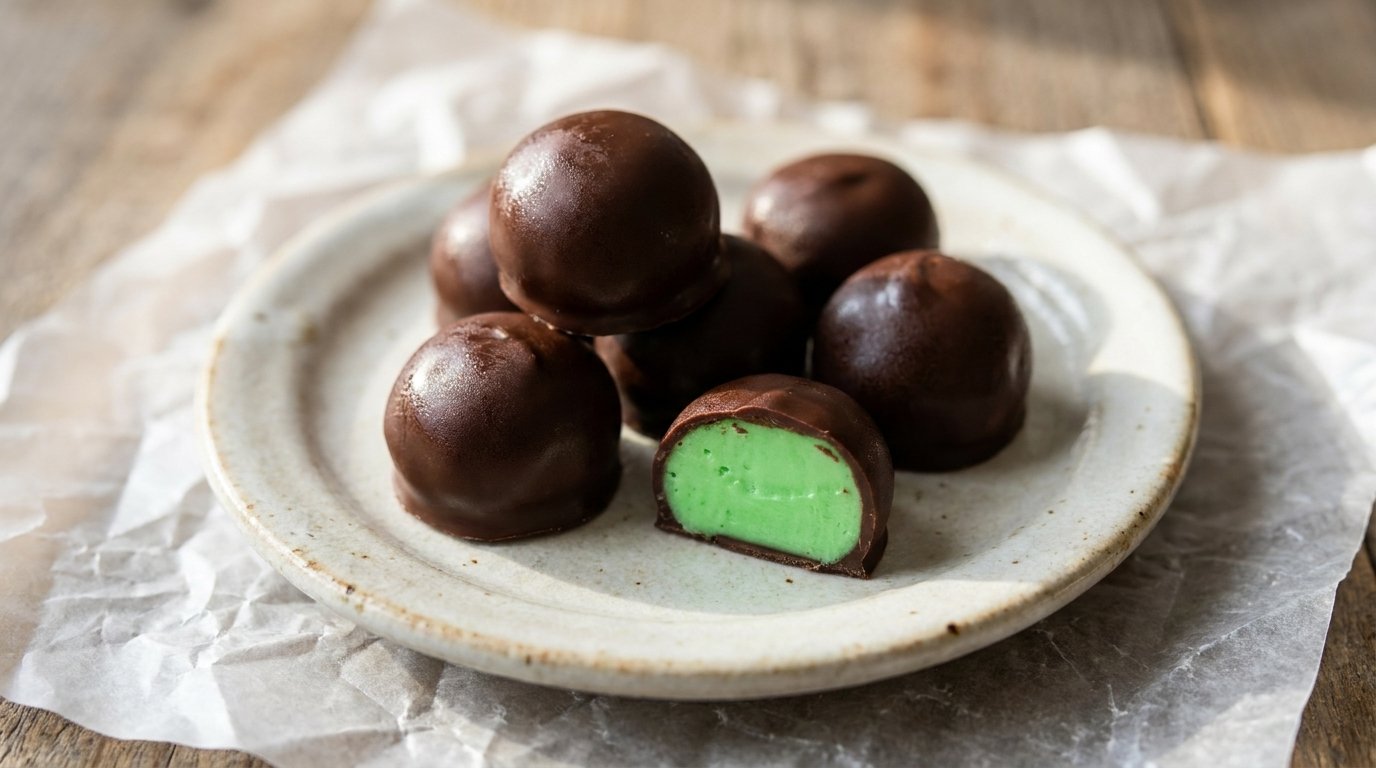
These peppermint cream candies start with a soft, minty center that comes together in one bowl. Sweetened condensed milk and powdered sugar form a pliable dough, and a few drops of peppermint extract give it that cool, clean flavor.
Then each little ball gets dipped in melted dark chocolate. The chocolate sets into a thin shell that cracks gently when you bite in, giving way to the tender cream inside. They are simple enough for a beginner, and they keep well for sharing.
What You Need
The center of these candies needs only three things: powdered sugar, sweetened condensed milk, and peppermint extract. A few drops of green food coloring tint the dough, though you can skip it if you prefer a plain cream center.
For dipping, use dark chocolate that melts smoothly. A bar chopped into small pieces works well, and it gives you more control than chocolate chips. You will also need wax paper and two baking sheets.
Equipment
- Large mixing bowl: To combine the powdered sugar, condensed milk, peppermint extract, and food coloring into a dough.
- Wooden spoon or sturdy spatula: To stir the thick sugar mixture until it comes together.
- Measuring cups: To measure the powdered sugar.
- Measuring spoons: To measure the condensed milk and peppermint extract.
- 1-tablespoon measuring spoon: To portion the dough into evenly sized balls.
- Baking sheets: To hold the candy balls and the dipped candies while they set.
- Wax paper: To line the baking sheets so the candy does not stick.
- Double boiler or a heatproof bowl set over a saucepan: To melt the dark chocolate gently.
- Fork or dipping tool: To lower each cream ball into the chocolate and lift it out.
- Small bowl or container: To hold the chopped dark chocolate while it melts.
How to Make Peppermint Cream Candies
Step 1: Mix the Cream Center
Place the powdered sugar, condensed milk, peppermint extract, and green food coloring in a large mixing bowl. Stir everything together until the powdered sugar disappears and the mixture forms a soft dough.
The dough should hold together when you press it, but it should not feel wet or sticky. If it seems too dry, add a tiny splash of condensed milk. If it feels too soft, work in a spoonful of powdered sugar.
Step 2: Shape the Candy Balls
Line a baking sheet with wax paper. Use a 1-tablespoon measuring spoon to scoop the dough, then roll each scoop into a smooth ball with your hands. Place the balls on the prepared sheet as you go.
Keep the balls roughly the same size so they dip evenly and set at the same rate.
Step 3: Melt the Dark Chocolate
Chop the dark chocolate into small, even pieces. Put the chocolate in the top of a double boiler, or in a heatproof bowl set over a saucepan with an inch of simmering water. The bowl should not touch the water.
Stir the chocolate frequently until it is almost fully melted. Then take it off the heat and keep stirring until the last pieces disappear. Let the chocolate cool for a few minutes before dipping. Chocolate that is too hot can soften the cream centers or turn grainy. Consumer Reports recommends keeping melted dark chocolate below 120°F to avoid scorching or separation.
Step 4: Dip the Cream Centers
Line a second baking sheet with wax paper. Lower one cream ball into the melted chocolate with a fork. Turn it gently so the chocolate coats the whole surface, then lift it out and let the excess chocolate drip back into the bowl.
Place the dipped candy on the wax paper. Repeat with the remaining balls, working in small batches so the chocolate stays fluid.
Step 5: Let the Candies Set
Leave the dipped candies at room temperature until the chocolate firms up. This can take a few hours, depending on the temperature of your kitchen. For the cleanest finish, let them sit overnight before wrapping or storing them.
Once the chocolate is fully set, the candies are ready to eat or package.
Cooking Tips
Keep the chocolate away from water. Even a small splash of water can make melted chocolate seize and turn stiff. Dry your tools and your hands before you start dipping.
Use a fork, not your fingers. A fork lets you turn the candy in the chocolate without leaving fingerprints in the coating.
Dip while the chocolate is fluid. If the chocolate thickens too much as you work, set the bowl back over the warm water for a few seconds and stir again.
Peppermint extract is strong. Start with a few drops, taste a tiny piece of the dough, and add more only if you want a stronger mint flavor. Peppermint extract is generally recognized as safe for food use, but its flavor concentrates quickly.
How to Serve
These candies are ready to eat once the chocolate sets. Pile them in a small bowl for a party, or pack them into candy boxes or small gift bags. They also work well on a holiday cookie tray alongside other homemade treats.
If you enjoy peppermint and chocolate together, you might also like our homemade peppermint bark candies, which use a similar flavor pairing in a crisp, layered form. For another chocolate-dipped treat, try our chocolate-covered cherries or mint.
Recipe Notes
The recipe uses a full 1-pound bag of powdered sugar, which is about 4½ cups. If your bag is a slightly different weight, measure by cups rather than assuming the whole bag is exactly right.
The green food coloring is optional. It gives the candies a pale mint-green center, but the flavor comes entirely from the peppermint extract.
Store the finished candies in an airtight container in a cool, dry place. If your kitchen is warm, keep them in the refrigerator so the chocolate does not soften. Let them sit at room temperature for a few minutes before serving if you prefer a softer center.
If you like creamy, milk-based desserts, our homemade tapioca honey milk is another simple sweet that uses condensed milk. You can also browse more Cambodian desserts and drinks for other easy ideas.
Frequently Asked Questions
Can I use milk chocolate instead of dark chocolate?
Yes. Milk chocolate will give you a sweeter, softer shell. Melt it gently over low heat, because milk chocolate scorches more easily than dark chocolate. Keep the bowl dry and stir often.
Do I have to use green food coloring?
No. The food coloring is only for appearance. Leave it out and the cream centers will be off-white. The peppermint flavor will be the same. If you do use coloring, check that the brand you buy is approved for food use, such as an FD&C color additive listed by the FDA.
How long do the candies last?
Store them in an airtight container in a cool place for up to two weeks. If the chocolate begins to bloom or the centers feel soft and sticky, discard them.
Can I make the cream centers ahead of time?
Yes. Shape the balls, place them on a wax-paper-lined sheet, and refrigerate them for a few hours or overnight. Let them sit at room temperature for about 15 minutes before dipping so the chocolate adheres smoothly.
Final Thoughts
The appeal of these candies is the contrast: a cool, tender mint center and a thin, crisp chocolate shell. They do not need special equipment or a candy thermometer, and the whole process stays in one bowl until the dipping stage. Make a batch when you want something homemade and giftable, and let the chocolate set fully before you wrap them. The wait is the hardest part.
Peppermint Cream Candies Recipe
4
servings30
minutes10
minutes925
kcal40
minutesThese beginner-friendly peppermint cream candies have a tender, minty center and a thin dark chocolate shell. The dough comes together in one bowl, and the candies set at room temperature.
Ingredients
4½ cups (about 1 pound) powdered sugar
9 tbsp sweetened condensed milk
Few drops peppermint extract
Few drops green food coloring (optional)
8 oz dark chocolate, for dipping
Directions
- Mix the powdered sugar, condensed milk, peppermint extract, and green food coloring in a large bowl until a soft dough forms.
- Line a baking sheet with wax paper. Scoop the dough with a 1-tablespoon measuring spoon and roll into smooth balls. Place on the wax paper.
- Chop the dark chocolate and melt it in a double boiler or a heatproof bowl set over simmering water, stirring until smooth. Cool slightly.
- Dip each cream ball in the melted chocolate, turning to coat. Lift with a fork and let the excess drip off. Place on a second wax-paper-lined sheet.
- Let the candies sit at room temperature for a few hours or overnight until the chocolate is fully set.
Equipment
 Baking dishCheck product details
 Measuring Spoons & CupsCheck product details
 Mixing BowlsCheck product details
 Silicone Spatula SetCheck product details
 Small bowlCheck product details
 Small potCheck product details
 Wooden SpoonCheck product details





Recipe Video
Recipe Notes
- The green food coloring is optional. Store in an airtight container in a cool place for up to two weeks. If the kitchen is warm, refrigerate.
Nutrition Facts
- Serving Size: 3 g
- Total number of serves: 4
- Calories: 925kcal
- Fat: 28.1g
- Saturated Fat: 16.4g
- Cholesterol: 17mg
- Sodium: 71mg
- Potassium: 575mg
- Carbohydrates: 163.7g
- Net Carbs: 157.5g
- Fiber: 6.2g
- Sugar: 149g
- Protein: 8g
- Vitamin A: 7.1mcg
- Vitamin C: 1.2mg
- Calcium: 170mg
- Iron: 7mg
- Vitamin E: 0.4mg
- Vitamin K: 4.4mcg
- Thiamin: 0.1mg
- Riboflavin: 0.3mg
- Niacin: 0.7mg
- Vitamin B12: 0.4mcg
- Folate: 5mcg
- Pantothenic Acid: 0.6mg
- Phosphorus: 288mg
- Magnesium: 141mg
- Zinc: 2mg
- Selenium: 11.2mcg
- Copper: 1mg
- Manganese: 1.1mg
Did you make this recipe?
Tag @cambodiarecipe on Instagram and hashtag it
Like this recipe?
Follow us @cambodiarecipe on Pinterest
Did you make this recipe?
Follow us on Facebook